Tutorial — Part 4
Step #3: Generate a report
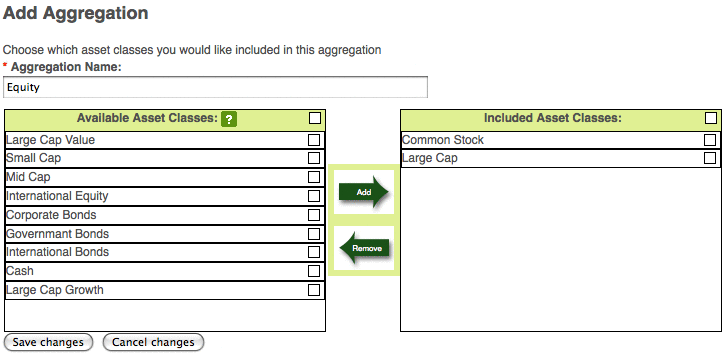
Defining an aggregation
One of the most powerful features of FreePerformanceReport.com is its ability to sum asset classes to create aggregated asset classes. For example, the Common Stock and Large Cap can be added together to form the "Equity" asset class. This will allow FreePerformanceReport.com to calculate performance for your entire Equity portfolio in addition to the asset classes Total, Corporate Bonds, Large Cap, and Common Stock. This is a premium feature of FreePerformanceReport.com and may not be available for your membership level.
To manage your aggregations, navigate to Reporting Options -> Manage Aggregations (or simply follow this link.) To add a new aggregation, click the 'Add a new aggregation' button. In the text field at the top, enter the name for your aggregation. For the purposes of this tutorial, name the aggregation 'Equity'.
Next, with the mouse simply drag the asset classes you wish to include in this aggregation from the 'Available Asset Classes' box on the left to the 'Included Asset Classes' box on the right. For the purposes of this tutorial, include the 'Common Stock' and 'Large Cap' asset classes in the new "Equity" asset class. Your screen should look like the screenshot below. Click 'Save changes' to save your new aggregation.
TIP: This drag and drop interface appears in many places throughout FreePerformanceReport.com. You may drag individual elements between the two boxes with the mouse. Alternatively, you may move multiple elements by clicking the square checkbox to the right of one or more elements, and then clicking the 'Add' or 'Remove' buttons. The box to the right of each box's titlebar will toggle selection for all elements beneath it. Elements may also be re-ordered by dragging with the mouse.
Generating a report
Click 'Create Report' on the left menu or click here to open the report generation screen. The screen contains all the available report options. Two fields are required: 'Select an account' and 'Report pages'. Other options will be assigned reasonable defaults if left empty.
To begin generating your report, select 'Venture Capital' from the 'Select an account' drop down. Several fields will be filled in for you automatically at this time. For example, the start and end date fields will be filled with the account inception date and the date of the last available market value, respectively. (To override these settings, click the 'Set Custom Date Range' checkbox and fill in the start and end dates manually).
Select which pages should be included in the report. For purposes of this tutorial, include all available pages by clicking the box to the right of the 'Available Pages' titlebar, then clicking the 'Add' arrow. You may reorder the included pages by dragging individual pages with the mouse. More information about how to use this interface is available here. To enable the Title page and Table of Contents, click the checkboxes below the included pages.
Some report exhibits present performance calculations for multiple date ranges on a single page. Currently, 'Returns Chart' and 'Returns Histogram' both have this capability. The 'Custom Date Ranges' field is used to specify the date ranges to show on these pages. If you do not specify any date ranges, they will be chosen for you by the system.
The Aggregations field allows you to choose which aggregations to present performance calculations. Only aggregations that contain asset classes relevant to the account selected will available for selection. For purposes of this tutorial, select the 'Equity' aggregation for inclusion in this report by dragging it to 'Included Aggregations' with the mouse.
The Indexes field allows you to compare your performance calculations against various market indexes. For purposes of this tutorial, include the S&P 500 index in this report by dragging it to 'Included Indexes' with the mouse.
By default, all available asset classes are included in the report. If you wish to override this setting, click 'Choose to show specific asset classes in this report' and select which asset classes to include. For purposes of this tutorial, leave this box unchecked to keep the default setting.
You are now ready to generate your first report. Click the 'Email me my report' button and your report will be delivered to your email as soon as it is ready. To change the email delivery address, click the 'Member information' link at the top of the screen or visit this page after signing in, then click 'Edit'.
Click here to view the completed report.