Tutorial — Part 1
Step #1: Create a new account
Step 1 of this tutorial will take you through the process of creating a new account.
Click here to open the new account screen in a new window.
Basic Account Information
Enter an account name in the text box and select an account type from the drop-down list. You may create your own account type by clicking 'Create my own account type...' from the drop down menu.
For the purposes of this tutorial, name this account "Venture Capital" and assign it type 'Speculative Account'. The fields should look like the screenshot below.

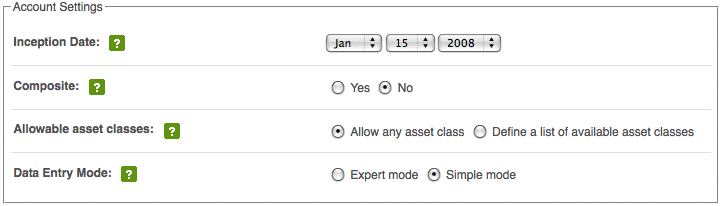
Account Settings
Select the inception date for your account. Generally, this is the date of the first flow of cash. For the purposes of this tutorial, assume that money was first contributed to this account on January 15, 2008. Enter this date into the drop down menus.
Composite accounts are a premium feature that allow you to report on multiple individual accounts as a single entity. If your membership level permits this feature, you have the option to choose yes here. For the purpose of this tutorial, choose 'No'.
The 'allowable asset classes' feature is a setting that restricts the asset classes for which this account accepts data. This feature can help you prevent data entry errors. If you choose to restrict the available asset classes, you will have the opportunity to define the asset classes on the page after you submit the form. For the purposes of this tutorial, choose 'Allow any asset class'.
Data entry mode has two options, simple and expert. 'Expert' mode requires you enter the transaction data in standard double-entry accounting. 'Simple' mode keeps track of your cash and total fund for you, effectively eliminating one half of each double-entry transaction. For the purposes of this tutorial, select 'simple' mode. The fields should look like the screenshot below.
Click the 'Add Account' button to proceed.